End-to-End CI for Databricks: Automated PyTest Pipelines with Azure DevOps
Mon Mar 16 2026
Most data teams aren’t testing their Databricks code the way it runs in production. Even fewer are running automated pipelines that execute those tests on every code change.
Local pytest runs help, but they miss a key problem: your code depends on Spark, clusters, and specific runtime environments.
That means proper testing often needs to run inside Databricks itself and report results back to your CI system.
The challenge is that there’s no clean, built-in way to do this across Databricks and Azure DevOps. Tools like Nutter try to solve the problem, but they require rewriting your tests and moving away from standard frameworks like pytest.
This guide shows how to build an end-to-end workflow that:
- runs
pytestinside Databricks - triggers from Azure DevOps pull requests
- exports JUnit XML results
- fails the pipeline when tests break
When I built this in early 2025, I spent a lot of time digging through documentation and realized there wasn’t a straightforward solution. I ended up building this from scratch, and this guide is that solution.
What You Will Build
By the end of this setup, you will have a pipeline that:
- Triggers from a branch or pull request in Azure DevOps
- Starts a Databricks test run
- Executes your
pytestsuite in the Databricks environment - Exports a JUnit XML report
- Publishes test results directly in Azure DevOps
CI Execution Flow (Azure DevOps ↔ Databricks)

High-level CI flow for validating Databricks code from an Azure DevOps pull request. The pipeline invokes a Databricks job, runs the PR source branch tests, exports a JUnit XML report, and publishes results back to Azure DevOps for pass/fail enforcement.
Step 0: Prerequisites
Before getting started, make sure you have:
- A Databricks workspace
- A project with
pytest-based tests - Access to Azure DevOps repositories and pipelines
- A Databricks cluster available for test execution
Important: Spark and PyTest
pytest tests do not have access to a Spark session by default. If you want to validate Spark-based logic, define a shared fixture:
import pytest
from pyspark.sql import SparkSession

@pytest.fixture(scope="session")
def spark():
    return SparkSession.builder.master("local[*]").getOrCreate()
Then use it in your tests:
def test_example(spark):
    df = spark.createDataFrame([(1,)], ["value"])
    assert df.count() == 1
Step 1: Create a Test Runner for CI
We need a way to trigger pytest inside Databricks and export results in a format Azure DevOps can consume.
1.1 Create a Test Runner Script
Create the following notebook file:
/Workspace/Repos/my_project/tests/run_testsAdd:
import pytest

pytest.main([
    "--junit-xml",
    "/Workspace/Repos/my_project/tests/reports/report.xml",
    "."
])
This script:
- Runs your full test suite
- Writes results in JUnit XML format
- Saves the report to
/Workspace/Repos/my_project/tests/reports/report.xml
That XML file is the key handoff between Databricks and Azure DevOps.
Azure DevOps natively understands JUnit format, which allows it to display structured test results and enforce pipeline failure conditions.
Step 2: Configure the Databricks CLI
This step is optional, but useful for local validation and debugging before integrating with Azure DevOps.
Databricks supports multiple authentication methods (PAT, OAuth, service principals). For simplicity, this example uses a personal access token (PAT).
2.1 Generate a Personal Access Token
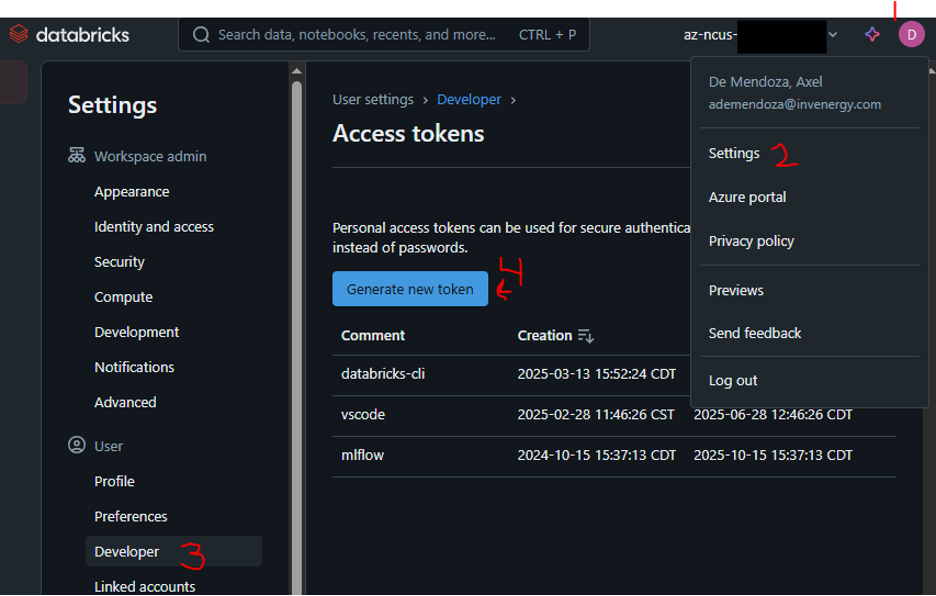
Navigate to:
Databricks -> User Settings -> Developer -> Access Tokens
Create a new token and save the key.
2.2 Configure the CLI
Run:
databricks configureEnter:
- Databricks host
- Personal access token

Step 3: Validate with a Databricks Job
Before integrating with Azure DevOps, it is helpful to validate that your tests run correctly inside Databricks in isolation.
In this step, we will trigger a Databricks job directly from the CLI using a local JSON definition. This allows you to debug test execution without involving the CI pipeline.
3.1 Create a Job Definition
Create a local file (for example databricks-run.json) with the following contents:
{
  "name": "run_unit_tests",
  "tasks": [
    {
      "task_key": "run-test-notebook",
      "notebook_task": {
        "notebook_path": "/Workspace/Repos/my_project/run_tests"
      },
      "existing_cluster_id": "<cluster-id>"
    }
  ]
}
This defines a Databricks job that runs your test notebook on an existing cluster.
3.2 Submit the Job from the CLI
Run the following command locally:
databricks jobs submit --json @databricks-run.jsonThis sends the job definition to Databricks, which then executes the notebook remotely on the specified cluster.
3.3 Validate the Output
After the job completes, go to Databricks and confirm that the test report was generated:
/Workspace/repos/my_project/tests/reports/report.xmlThis path corresponds to the Databricks workspace filesystem under /Workspace/Repos, where your repository is mounted.
If this file exists, it means:
- your tests successfully executed inside Databricks
- your JUnit XML report is being generated correctly
At this point, the Databricks execution layer is working as expected, and you are ready to integrate it into an Azure DevOps pipeline.
This step is optional but highly recommended. It isolates issues in your Databricks environment before introducing additional complexity from CI/CD orchestration.
Step 4: Create the Azure DevOps Pipeline
Now we connect everything into an Azure DevOps pipeline that orchestrates the full test workflow:
- Determine which branch to test
- Trigger a Databricks job to run tests
- Export the test results
- Fail the pipeline if tests do not pass
Navigate to:
Pipelines -> New Pipeline
Then select:
- Azure Repos Git
- Your repository
- Python package
In the next sections, we will build the pipeline incrementally. Each snippet below represents a piece of the same azure-pipelines.yml file, which we will assemble into a complete pipeline at the end.
4.1 Determine Which Branch to Test
When a pipeline runs, it needs to know which branch’s code to execute.
This is especially important for pull requests, where you want to test the source branch being merged, not the target branch.
variables:
  - name: branch_name
    ${{ if startsWith(variables['Build.SourceBranch'], 'refs/heads/') }}:
      value: ${{ replace(variables['Build.SourceBranch'], 'refs/heads/', '') }}
    ${{ if startsWith(variables['Build.SourceBranch'], 'refs/pull/') }}:
      value: ${{ replace(variables['System.PullRequest.SourceBranch'], 'refs/heads/', '') }}
This logic ensures:
- manual runs use the current branch
- pull request runs use the PR source branch
4.2 Add Databricks Test Execution Step
Next, we invoke Databricks directly from the pipeline using a Bash task.
- task: Bash@3
  inputs:
    targetType: 'inline'
    script: |
      curl -fsSL https://raw.githubusercontent.com/databricks/setup-cli/main/install.sh | sh

      databricks configure --host $(DATABRICKS_HOST) --token $(DATABRICKS_TOKEN)
      echo $(branch_name)
      databricks repos update /Workspace/repos/my_project --branch $(branch_name)
      databricks jobs submit --json '{
              "run_name": "run_unit_tests",
              "tasks": [
                {
                  "task_key": "run-test-notebook",
                  "notebook_task": {
                    "notebook_path": "/Workspace/Repos/my_project/run_tests"
                  },
                  "existing_cluster_id": "<cluster-id>"
                }
              ]
            }'
This approach avoids rebuilding environments in the CI runner and instead executes tests directly in the Databricks workspace where the code runs in practice.
This step does several things:
- installs the Databricks CLI in the pipeline environment
- authenticates using secure pipeline variables
- checks out the correct branch
- triggers the Databricks job that runs your test notebook
At this point, your tests are executing remotely inside Databricks.
4.3 Add Test Export Step
Once tests complete, we need to retrieve the JUnit XML report.
databricks workspace export /tests/reports/report.xml report.xmlThis command:
- pulls the XML report from Databricks
- saves it locally in the pipeline environment
This file is the bridge between Databricks execution and Azure DevOps test reporting.
4.4 Add Test Reporting Step to Azure DevOps
- task: PublishTestResults@2
  inputs:
    testResultsFiles: 'report.xml'
    testRunTitle: 'Databricks PyTest Results'
    failTaskOnFailedTests: true
Azure DevOps natively understands JUnit format, which allows it to:
- display structured test results
- mark the pipeline as failed if tests fail
This is what enables automated enforcement of test quality on pull requests. Using a standard format like JUnit avoids custom parsing and allows CI systems to handle reporting and failure conditions automatically.
4.5 Validate the Pipeline
Once everything is configured:
- Run the pipeline manually to confirm it executes
- Open a pull request and verify the pipeline triggers automatically
- Intentionally break a test and confirm the pipeline fails
- Fix the test and confirm the pipeline passes
At this point, you have a fully functioning CI pipeline for Databricks workflows.
Full Pipeline YAML (Optional Reference)
For completeness, here is the full pipeline configuration assembled from the components above:
variables:
  - name: branch_name
    ${{ if startsWith(variables['Build.SourceBranch'], 'refs/heads/') }}:
      value: ${{ replace(variables['Build.SourceBranch'], 'refs/heads/', '') }}
    ${{ if startsWith(variables['Build.SourceBranch'], 'refs/pull/') }}:
      value: ${{ replace(variables['System.PullRequest.SourceBranch'], 'refs/heads/', '') }}

# trigger when PR created on the main branch
trigger:
- main

# provision ubuntu VM
pool:
  vmImage: 'ubuntu-latest'

steps:
# configure databricks CLI, checkout PR.source branch, and run notebook job
- task: Bash@3
  inputs:
    targetType: 'inline'
    script: |
      curl -fsSL https://raw.githubusercontent.com/databricks/setup-cli/main/install.sh | sh

      databricks configure --host $(DATABRICKS_HOST) --token $(DATABRICKS_TOKEN)
      echo $(branch_name)
      databricks repos update /Workspace/repos/my_project --branch $(branch_name)
      databricks jobs submit --json '{
              "run_name": "run_unit_tests",
              "tasks": [
                {
                  "task_key": "run-test-notebook",
                  "notebook_task": {
                    "notebook_path": "/Workspace/Repos/my_project/run_tests"
                  },
                  "existing_cluster_id": "<cluster-id>"
                }
              ]
            }'

      databricks workspace export /Workspace/Repos/my_project/tests/reports/report.xml

- task: PublishTestResults@2
  inputs:
    testResultsFormat: 'JUnit'
    testResultsFiles: 'report.xml'
    testRunTitle: 'Databricks PyTest Results'
    failTaskOnFailedTests: true
Step 5: Enforce CI on Pull Requests
Navigate to:
Project Settings -> Repositories -> Policies -> Main BranchEnable build validation and configure it as:
- Trigger: Automatic
- Policy Requirement: Required
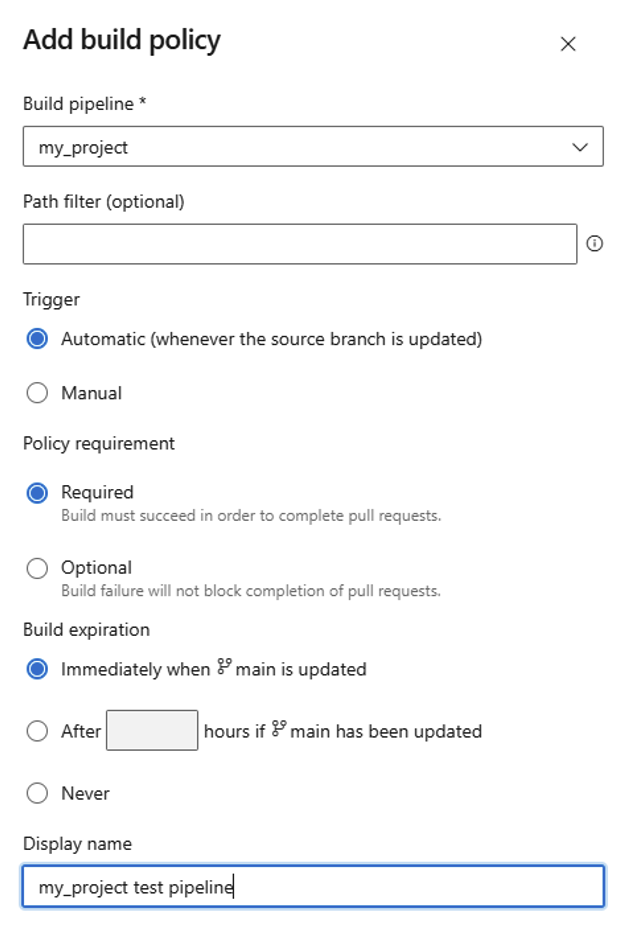
Configuring build validation to require passing tests before allowing merges.
This ensures that:
- every pull request automatically runs the pipeline
- merges are blocked unless all tests pass
This is what turns your pipeline from a passive check into an enforced quality gate for every code change.
Step 6: Validate the End-to-End Flow
Run through a quick sanity check:
- Open a pull request and confirm the pipeline triggers automatically
- Intentionally break a test and confirm the pipeline fails
- Fix the test and confirm the pull request can merge
At this point, your CI pipeline is actively enforcing test quality on every code change.
Final Thoughts
This setup provides:
- Real CI coverage for Databricks workflows
- Better confidence in production code changes
- Automated quality enforcement for pull requests
More importantly, it addresses one of the most common pain points in data engineering: validating code that depends on distributed systems while still maintaining the rigor of modern CI practices.
Instead of treating Databricks as a special-case environment, this approach brings it into the same testing and deployment discipline expected in production software systems.